Our Guest Wi-fi solution uses highly customizable splash pages that pop up on guests’ phones or other wifi devices in a captive portal. The splash page offers three ways to sign in:
- Email Login - User supplies their email address
- Facebook Login - User logs in with their Facebook account
- Guest Login - User skips providing information to the restaurant
Hardware note: The Meraki-Go setup is the only known setup incompatible with our integration. We recommend any MR-type model that fits your needs on capability and budget.
This integration has been tested on hardware model: MR-33/firmware: MR 27.5.1
Skip To:
- Step One: SSID
- Step Two: Access Control
- Step Three: Splash Page
- Step Four: Location and Scanning
- Step Five: Obtaining MAC Addresses
- Contacting Meraki Support:
Step One: SSID
- Hover over ‘Wireless’ in the left panel and select ‘SSID’ under the ‘Configure’ header
- Enable one SSID to be used as the guest network by selecting the drop-down and pressing ‘enable’
- Name the network(s) “*Restaurant Name - Guest” depending on which network you are configuring. You will have to repeat this process for each network corresponding to those venues. You may want to also consider #somethingclever or @yourinstagramhandle. Rename if configuring multiple networks
Note: Adding the * to the front of the network name ensures your network appears at the top of the available networks list on a guest’s device.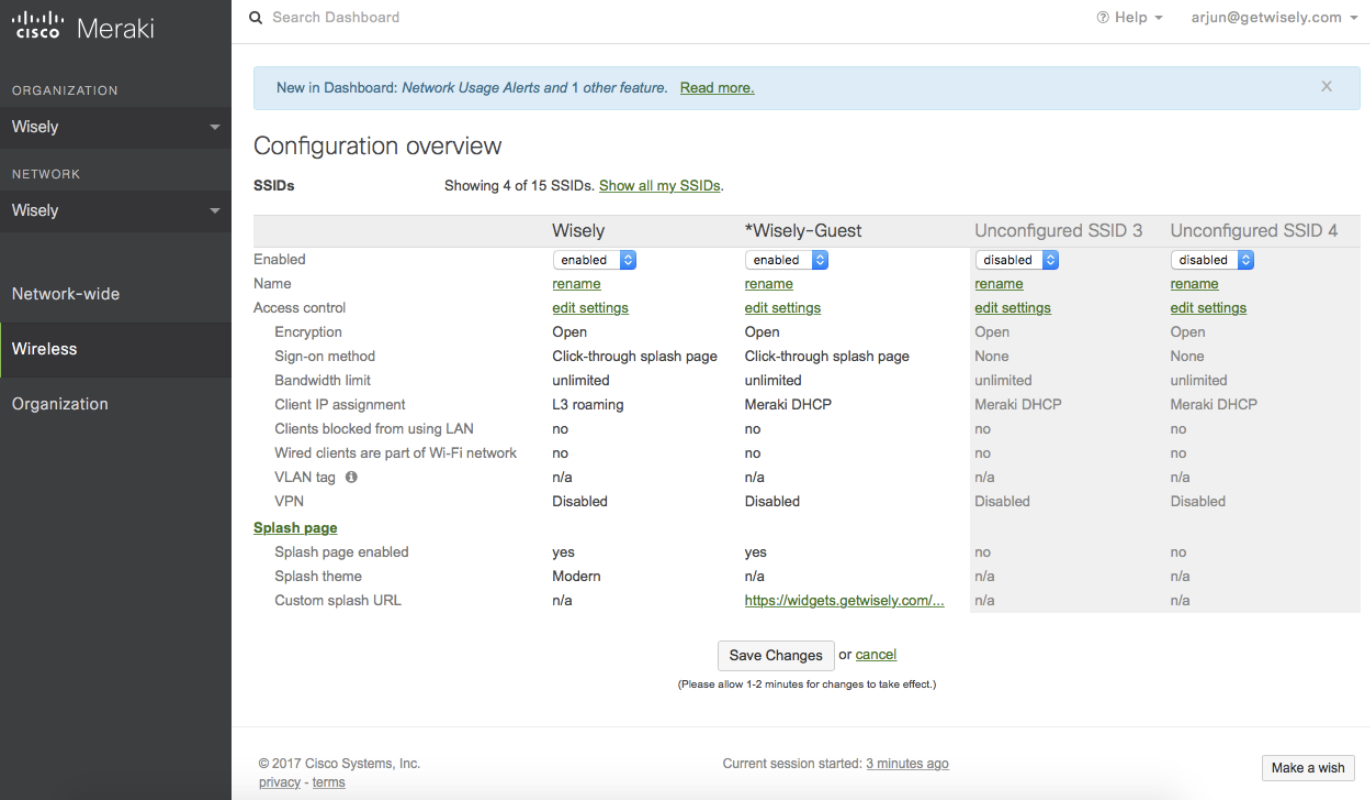
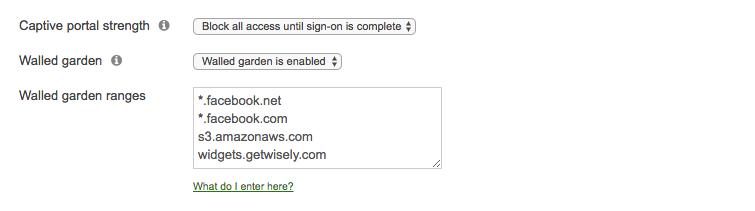
Step Two: Access Control
- Hover over ‘Wireless’ in the left panel and select ‘Access Control under the ‘Configure’ header
- Under the section ‘Network Access’ sub-header ‘Association Requirements’ select ‘Open (no – encryption)’
- Under the section ‘Network Access’ sub-header ‘Splash Page’ select ‘Click-through’
- Under the section ‘Network Access’ sub-header ‘Captive Portal Strength’ select ‘Block all access until sign-on is complete’
- Under the section ‘Network Access’ sub-header ‘Walled Garden’ select ‘Walled Garden is enabled’
- Under the section ‘Network Access’ sub-header Walled Garden Ranges add the following domains:
Note: You may get an error that says you must enter these domains as IP ranges. You will need to contact Meraki to enable domain handling if that is the case. Refer to the bottom of this document to see how to contact Meraki.
*.facebook.net
*.facebook.com
*.s3.amazonaws.com
s3.amazonaws.com
widgets.getwisely.com
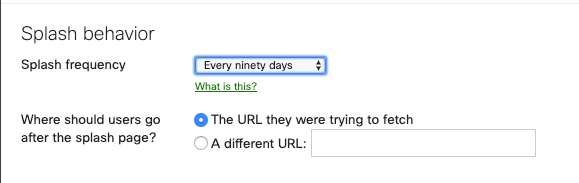
Step Three: Splash Page
- Hover over ‘Wireless’ in the left panel and select ‘Splash Page’ under the header ‘Configure’
- Select ‘Or provide a URL where users will be redirected’ under the header Custom Splash URL and enter the URL https://widgets.getwisely.com/splash

-
Scroll down to ‘Splash Behavior’ - We recommend setting the splash frequency to the maximum, 90 days
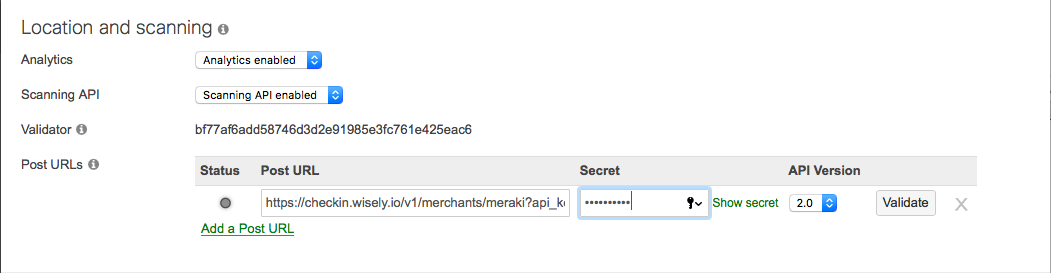
Step Four: Location and Scanning
- Hover over ‘Network Wide’ in the left panel and select ‘General’ under the header ‘Configure’
- Under the header ‘Location and Scanning’ choose ‘Analytics Enabled’ next to the drop down header ‘Analytics’
- Under the header Location and Scanning’ choose Scanning API Enabled’ next to the drop down header Scanning API
- Under the header ‘Post URLs add https://checkin.wisely.io/v1/merchants/meraki?api_key=[wisely_api_key] under ‘Post URL’, NoClough92! under ‘Secret,’ and API Version 2.0 under ‘API Version’. Your implementation specialist will provide you with the API key.
- We will also require the validator key which you will find next to the ‘Validator’ header under ‘Location and Scanning’. Please email this to us.
- Press ‘Validate’ when you have entered all of the fields. This is required.
- Press Save Changes after you have validated.
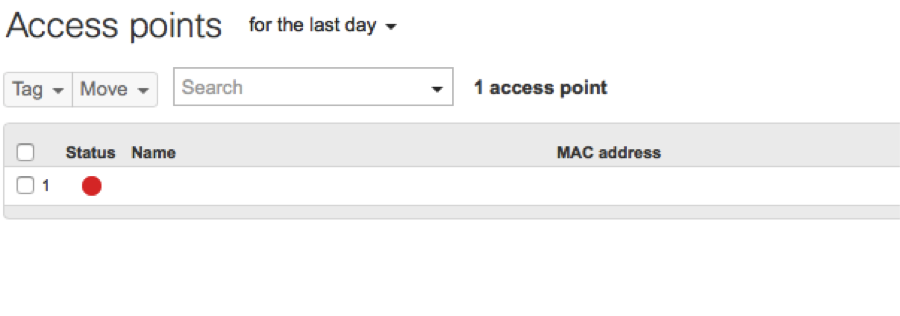
Step Five: Obtaining MAC Addresses
- Hover over ‘Wireless’ in the left panel and select ‘Access Points’ under the header ‘Monitor’
- You should see a list of devices and mac addresses
- Our team will need a list of which MAC Addresses correspond to which location. If you are unsure of the location the MAC Address belongs to, please tell us the network name located at the top of the dashboard.
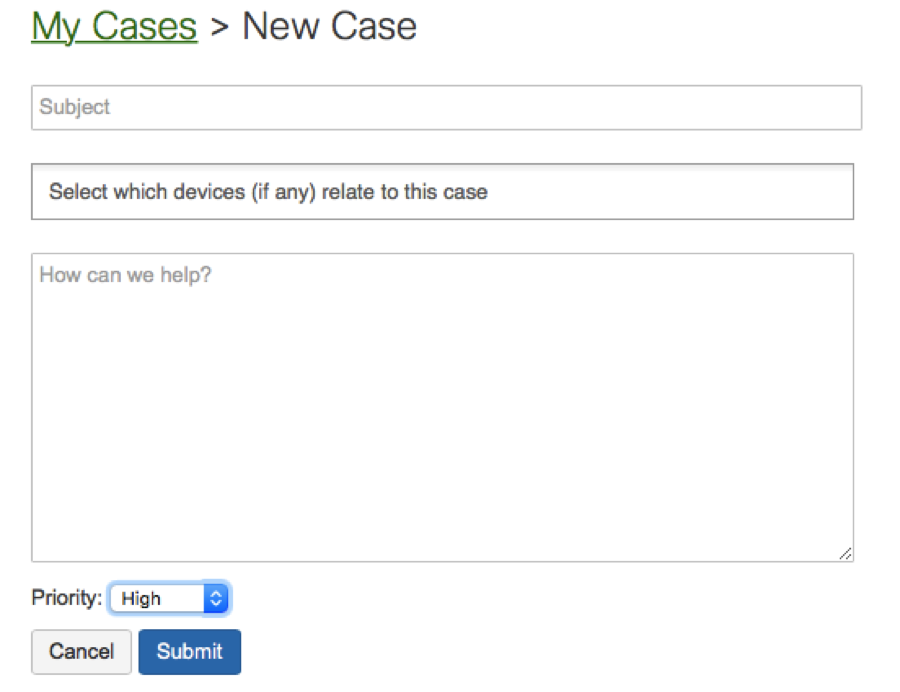
Contacting Meraki Support:
- Hover over ‘Help in the left panel and select ‘Cases’ under the header ‘Help
- Select ‘New Case’
Here is some Text you can use to get enable domain handling in the walled garden. If you are unsure what your organization name is you can find it under ‘Organization -> Settings’ :
- Subject: Enable website domains for walled garden
- Select which devices: Here you want to select all the relevant networks (and the APs under them) to your organization
- Body: I would like to enable web domains for my walled garden for my organization {organization name}. The networks I would like to enable it for are {network1}, {network2}, {networkN}, and my username/email is {‘email I logged into Meraki dashboard with’}
Note: For bandwidth allocation across Internal and Guest networks, please refer to Meraki’s “Group Policy” Setup Guide