NOTE: Virtual Machine (VM) hosting is not currently supported with this integration.
Self-hosted controllers or UDM machines are not supported
This integration is only supported for existing brands utilizing Ubiquiti
Our wifi integration uses highly customizable splash pages that pop up on guests’ phones or other wifi devices in a captive portal. The splash page offers three ways to sign in:
- Email Login - User supplies their email address
- Facebook Login - User logs in with their Facebook account
- Guest Login - User skips providing information to the restaurant
Skip To:
- Migration to V2
- Prerequisites
- Step One: Setting Up Controller Firewall
- Step Two: Matching Router MACs
- Step Three: Creating a Guest Network
- Step Four: Configuring Guest Control
- FAQs
Migration to V2
All clients who have implemented Ubiquiti with Olo prior to Jun 22, 2022, and need to upgrade to V2, must update the following items within their setup:
- Delete the Admin User you have created in the past
- Jump to Step Five: Configuring Guest Control
All clients who are implementing this integration after June 22, 2022, can start by follow the steps below:
Prerequisites
-
Publicly accessible UniFi “controller” (cloud) with a valid SSL certificate. See FAQ for details
-
Some IT teams deploy their UniFi cloud privately, which prevents us from talking to their server to authorize guests onto the network
-
All router MAC addresses, each tied to its corresponding location or store number. Please email these to your implementation specialist
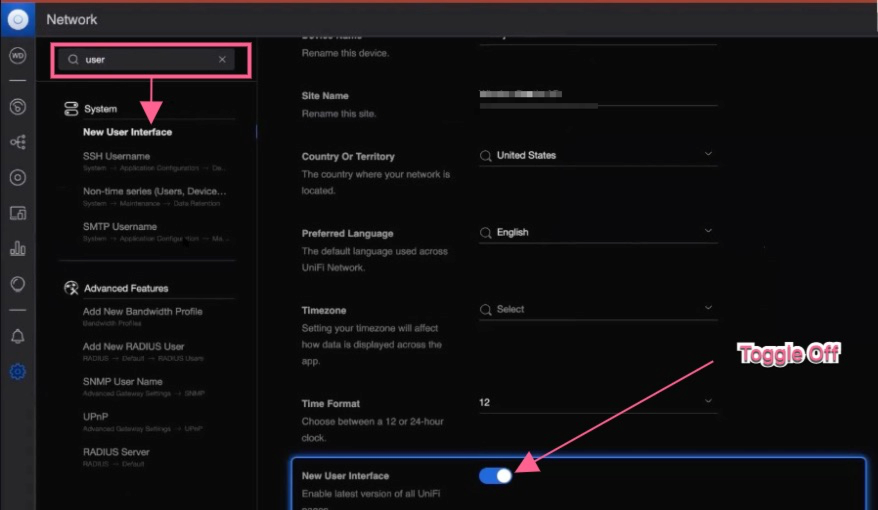
- You should be using the original, not the new user interface for your interface to match our documentation. To disable the new user interface search 'user' > click on 'new user interface' > Toggle that setting 'off'
Step One: Setting Up Controller Firewall
-
Add our system IP address to your firewall: 34.195.28.67
- All requests to authorize guest devices will flow through this IP
-
Not working? Make sure your firewall rule is assigned to the right network, for example, WAN
Step Two: Matching Router MACs
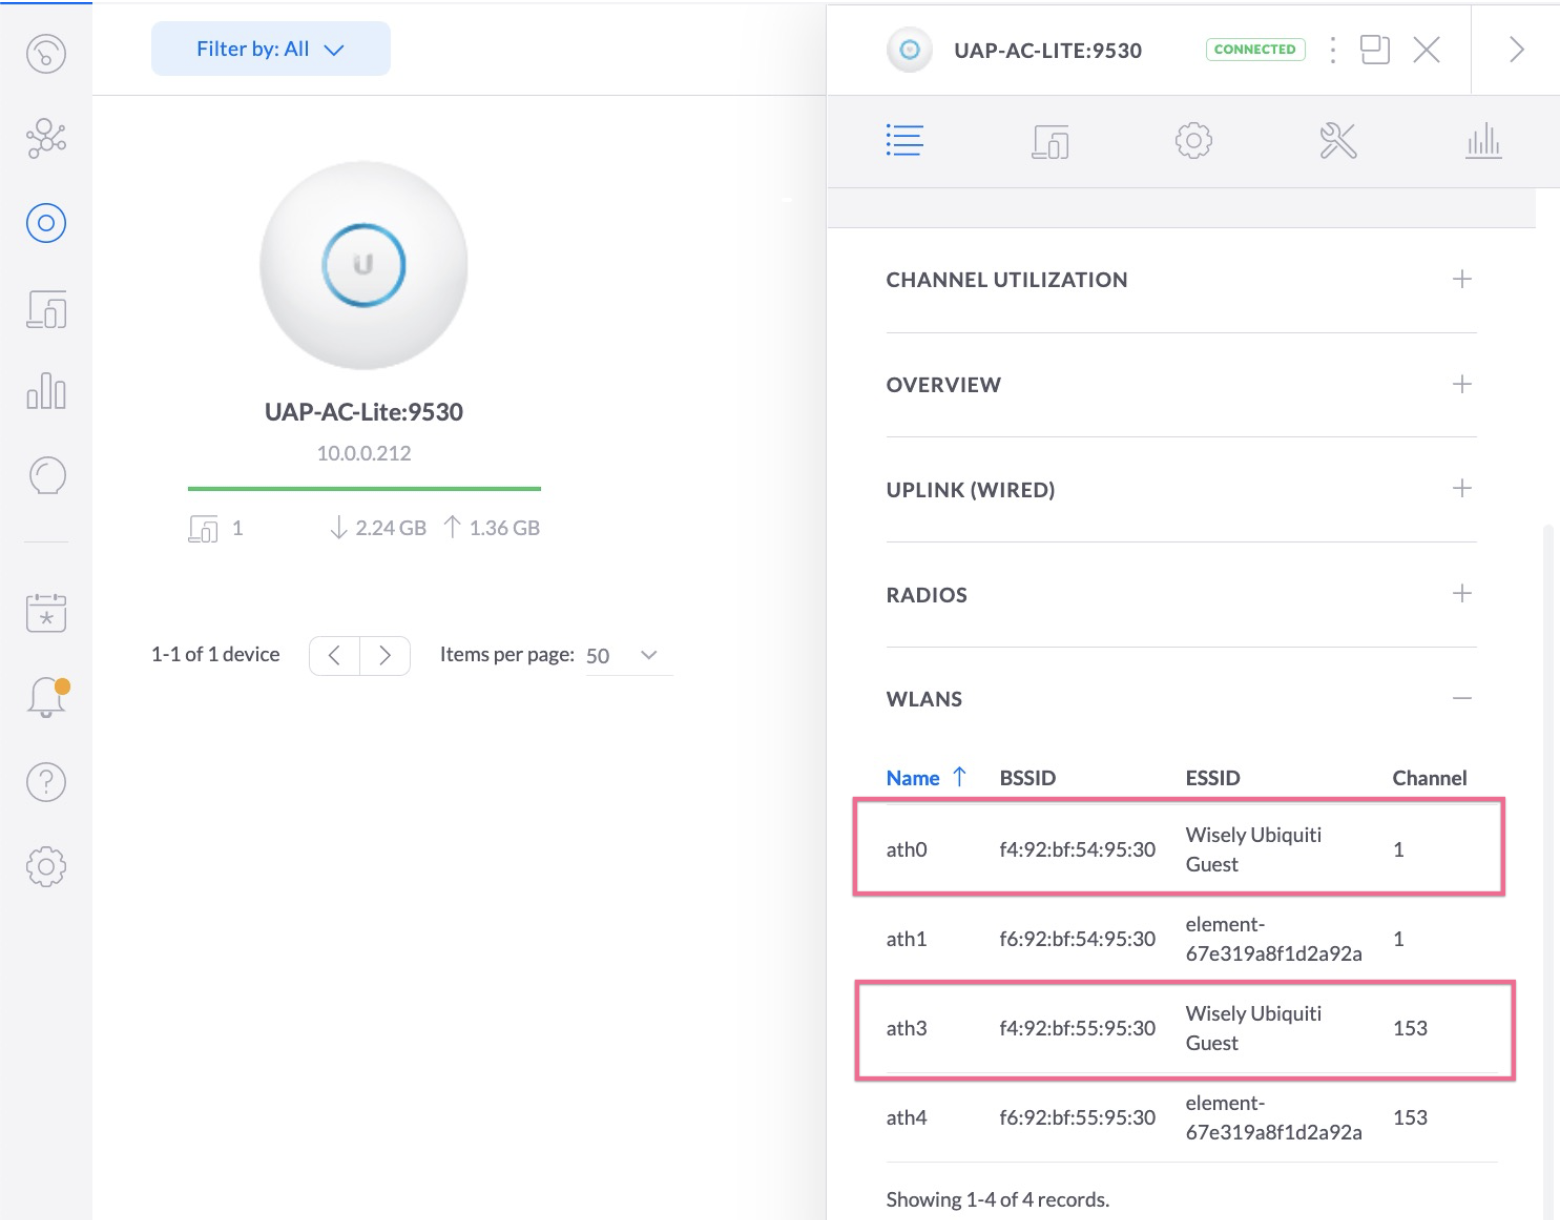
- Navigate to the Devices, and select an access point
-
Copy-paste the MACs for each WLAN channel, matched with a corresponding location or store number, to your implementation specialist
- Ubiquiti devices have multiple "radios" that broadcast the WiFi network
- Each radio has a separate MAC address
- Note: ‘Wisely Ubiquiti Guest’ below is just an example. Name the network anything you’d like
Step Three: Creating a Guest Network
- Log into your Unifi controller
- Navigate to Settings > Wireless Networks > Create New Wireless Network
- Name the network anything you’d like
- Set Security to ‘Open’

-
- Select ‘Apply guest policies’
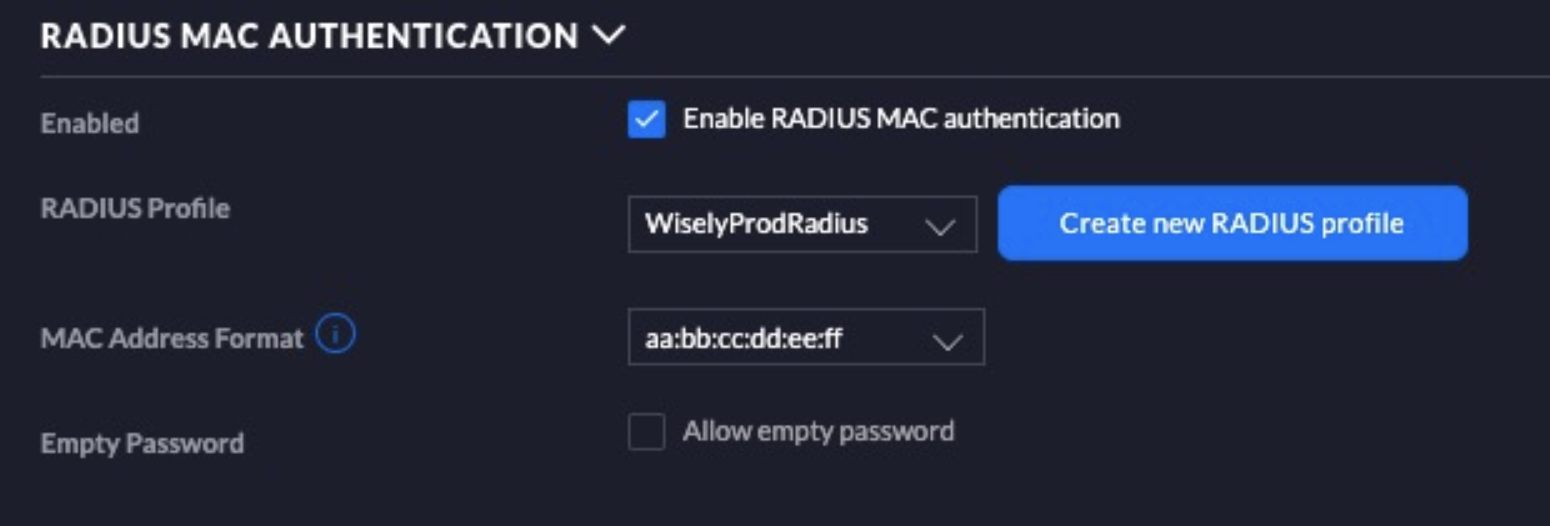
- Select Advanced Options > RADIUS MAC Authentication
- Select ‘Enable RADIUS MAC Authentication’
-
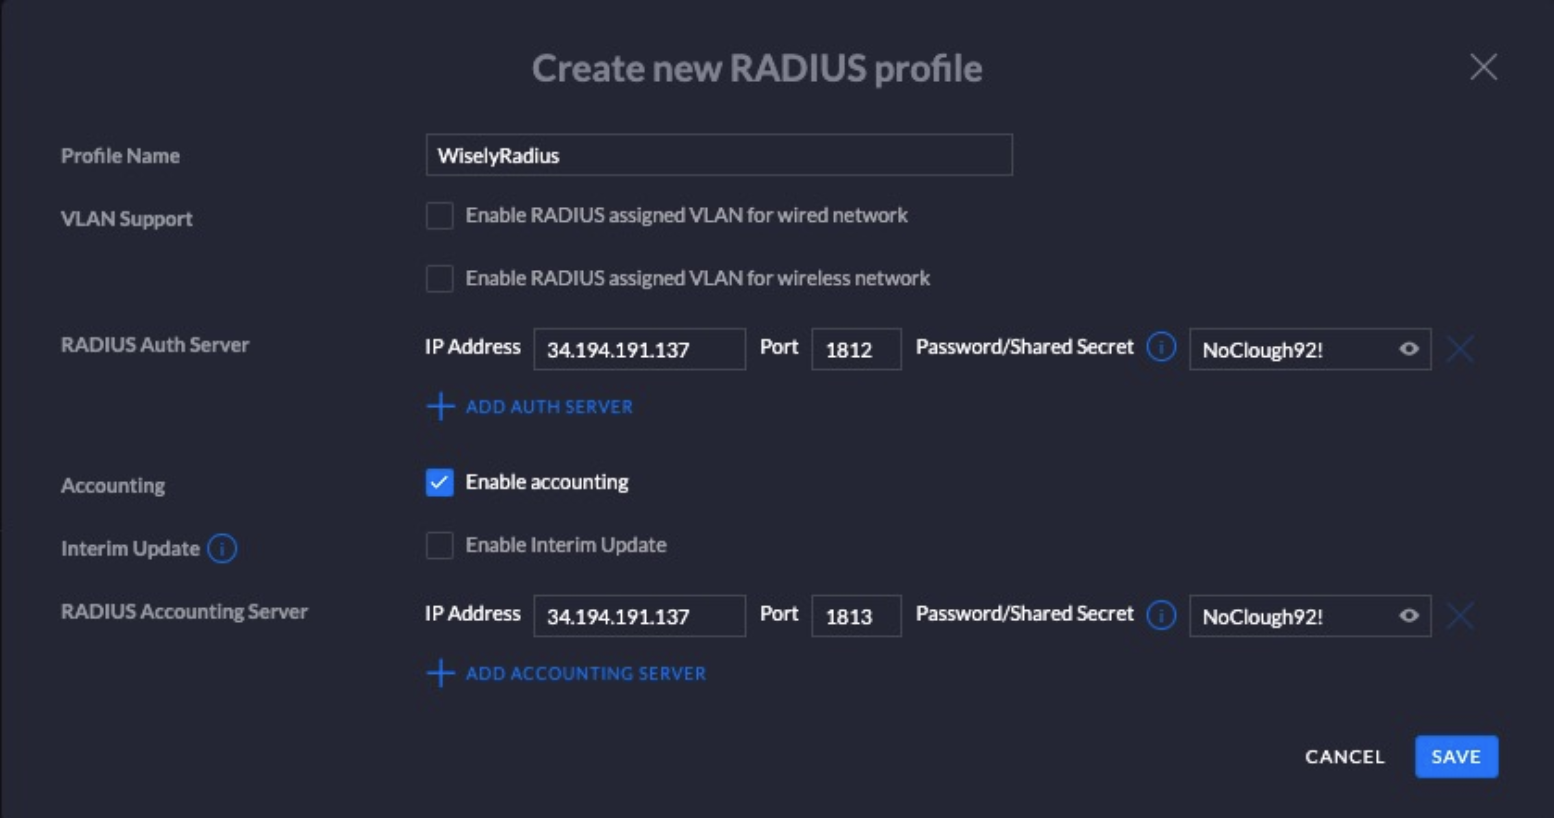
Click ‘Create new RADIUS profile’:
- Profile Name: WiselyProdRadius
-
Auth Server:
- IP Address: 34.194.191.137
- Port: 1812
- Password: NoClough92!
-
Accounting Server:
- IP Address: 34.194.191.137
- Port: 1813
- Password: NoClough92!
- Select ‘WiselyProdRadius’ as the RADIUS profile
- Choose this MAC format: aa:bb:cc:dd:ee:ff
- Click ‘Save’
Step Four: Configuring Guest Control
Guest Policies
- Navigate to Settings > Guest Control
- Select ‘Enable Guest Portal’
- Select ‘Hotspot’ for Authentication
-
Set the Expiration to 7 days, or whatever you would like
- This controls how long a guest session is valid for
-
Select ‘Redirect to the original URL’
- Since this is a custom captive portal, the Success Page that the guest visits is controlled via our dashboard. Reach out to our Support team if you would like a specific Success Page
- By default, we redirect the guest to google.com after a successful login
- Ensure you have no checked boxes underneath redirection (we will handle this with the two files below)

Portal Customization
- Select AngularJS template engine
- Check “Override Default Templates”

- Download the two files below (found at the bottom of this article)
- index.html
- auth.html
- These two files will live on your controller in the sites directory so you’ll have to ssh into the controller and upload them to the following locations (depending on your systems os):
- Windows: C:\Users\<username>\Ubiquiti UniFi\data\sites\default\app-unifi-hotspot-portal
- MAC: ~/Library/Application Support/UniFi/data/sites/default/app-unifi-hotspot-portal
- Linux: /usr/lib/unifi/data/sites/default/app-unifi-hotspot-portal
- UDM Pro: /data/unifi/data/sites/default/app-unifi-hotspot-portal
- CloudKey: /srv/unifi/data/sites/default/app-unifi-hotspot-portal
*Note: you may have to replace the `default` with your site name, if this folder structure does not exist at any point you can create the folders.
Hotspot
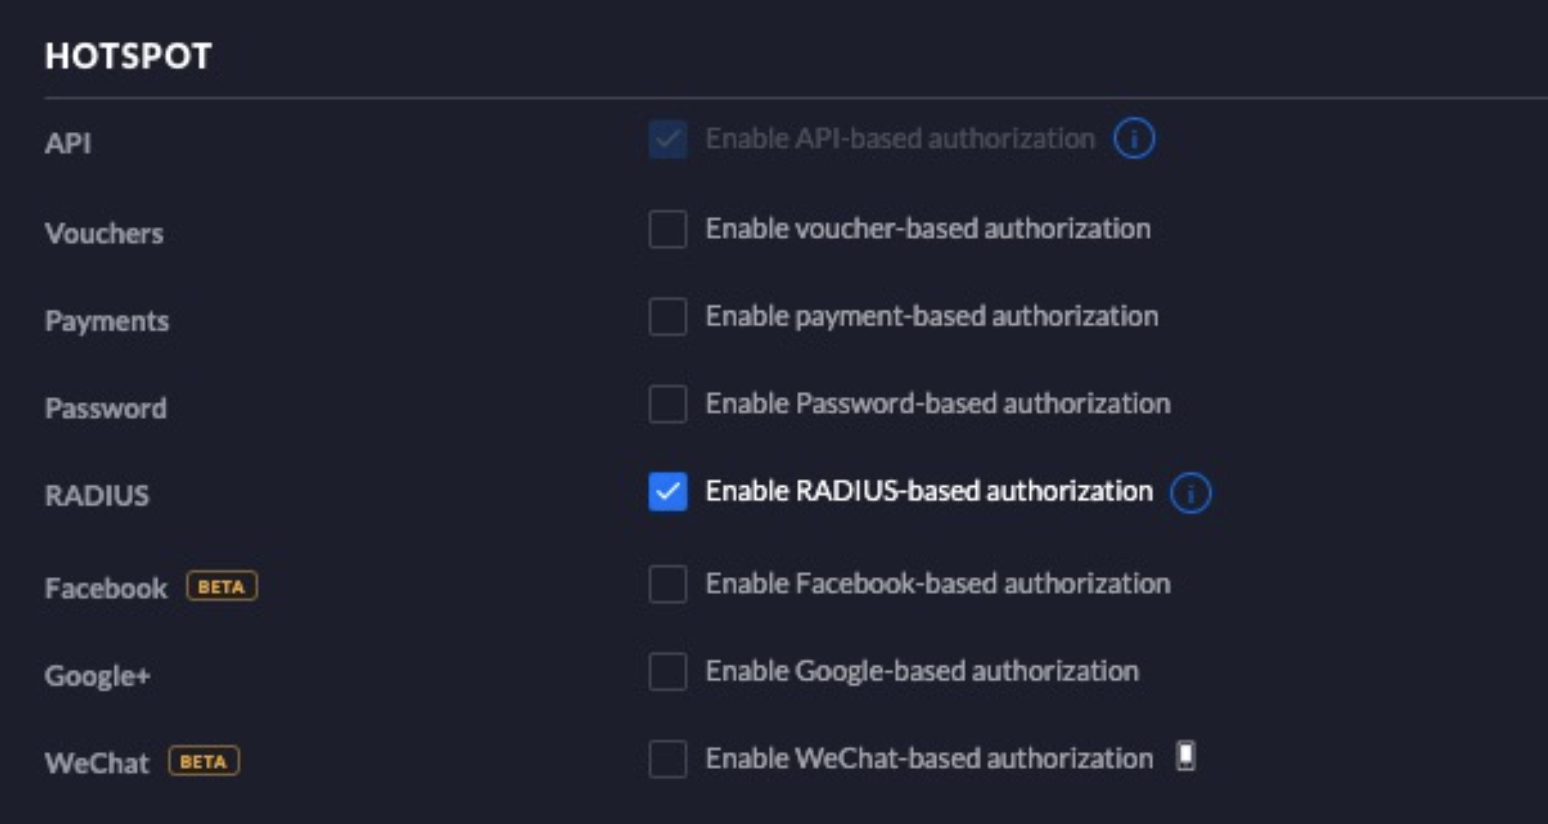
- Select ‘Enable RADIUS-based authorization’ under ‘Hotspot’
Radius
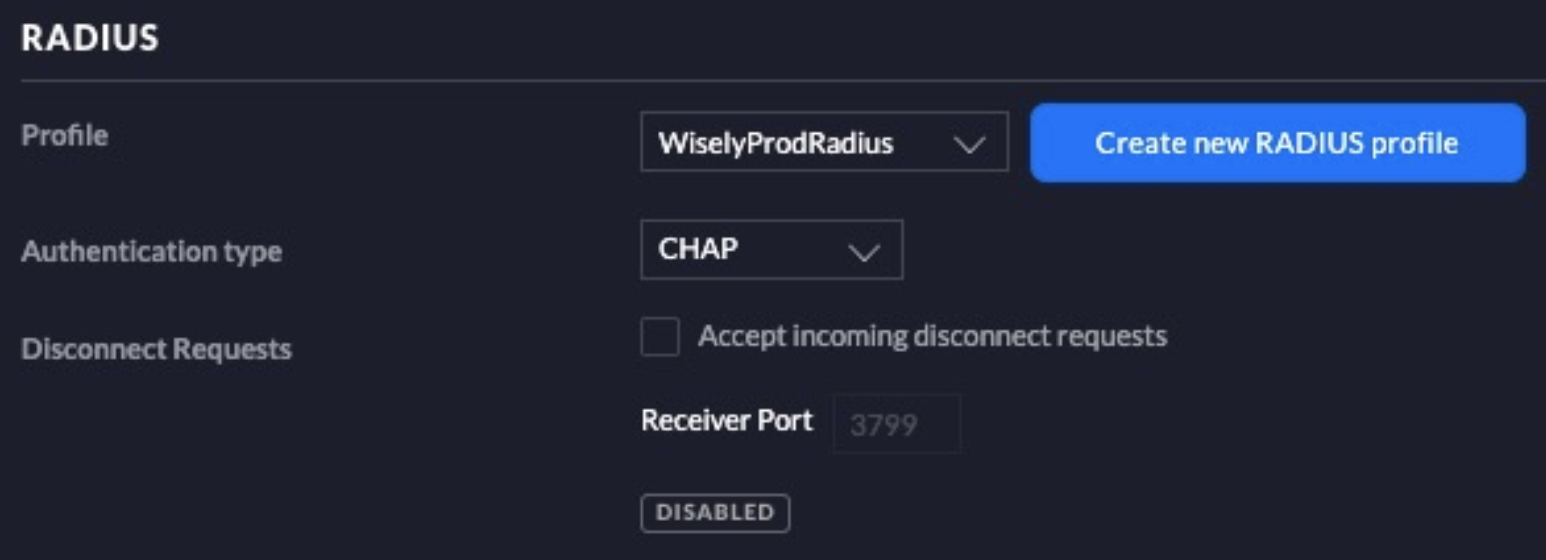
- Select your new profile under the ‘RADIUS’ section
- Set Authentication type to ‘CHAP’
Access Control
-
Add the following entries Under ‘Access Control’. Note: Unifi does not support wildcards in hostnames, like *.google.com
- api.wisely.io
- connect.facebook.net
- facebook.com
- s3.amazonaws.com
- midnight-merchant-assets.s3.amazonaws.com
- widgets.getwisely.com
- fonts.googleapis.com
- Keep the default Post-Authorization Restrictions, and click ‘Apply Changes’
- Wait for 1-2 minutes while the controller applies the new settings

FAQs
Why does my controller need a valid SSL certificate?
Our captive portal, hosted at widgets.getwisely.com, has Strict Transport Security (HSTS) enabled. This means that our site tells browsers that it should only be accessed using HTTPS. So, even if the Unifi controller directs guests to HTTP, a guest’s web browser will redirect them to the HTTPS version of our site. If your Unifi controller does not have a valid SSL certificate, guests will get a certificate error in your browser. Our system does not accept self-signed certificates.
I’m testing in a lab location, how do I “forget” my device and try the sign-in again?
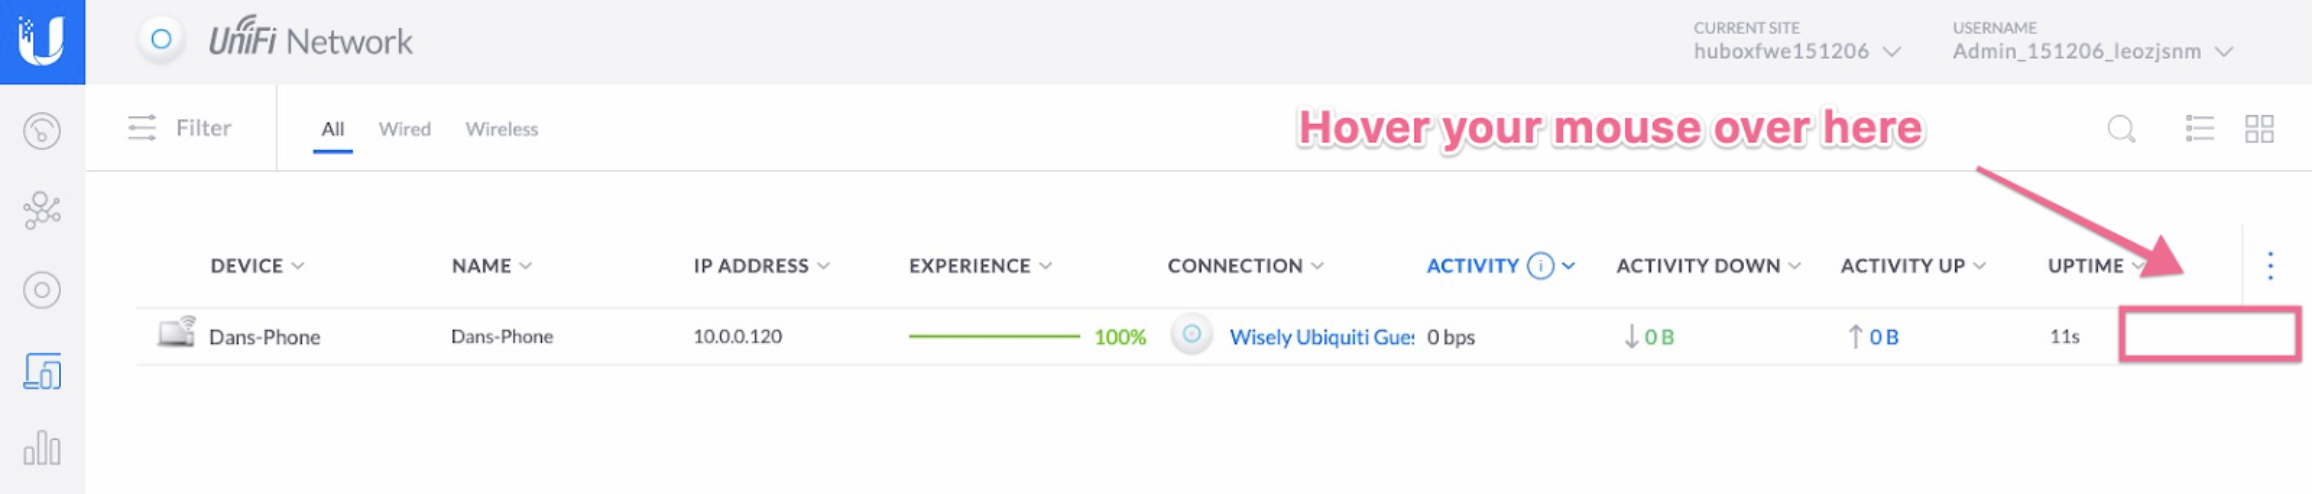
The UniFi cloud has an option for “deauthorizing” your device.
Go to Dashboard > Clients, hover over your device, and click “Deauthorize”
What environment does your lab use?
We host our test environment on Hubox.co, a simple Unifi controller service.
We support version 6 and above. Older versions have a substantially different UniFi API, which we need for granting access to guests.
UI version: 6.0.41
Backend Version: 6.0.41
Build: atag_6.0.41_14327
Is there a way to test that my controller is accessible?
This CURL request demonstrates what our backend does to login to the UniFi controller:
curl --location --request POST 'https://YOUR_BASE_URL:8443/api/login' \

--data-raw '{"username":"YOUR_USERNAME","password":"YOUR_PASSWORD"}'
If the controller is public-facing, and the credentials are valid, a response of this form will be returned:
{"meta":{"rc":"ok"},"data":[]}
If your system is deployed privately, that’s ok, just make sure to add our IP address to your firewall.
What kind of load will your software put on our server? How many API calls per day, or per hour?
Every time a guest clicks “Submit” to login from the captive portal, we make two requests:
- POST https://YOUR_BASE_URL:8443/api/login, to get a login cookie
- POST https://YOUR_BASE_URL:8443/cmd/stamgr, to authorize the guest
No other requests are made to the controller.
Server load will depend entirely on the number of guest logins being processed.
For example, if a store gets 30 guest signups per hour, 60 total API calls will be made per hour.